
With Google’s new release of an SSL Certificates having a small ranking boost on search engine ranking, we’ve decided to release an easy tutorial on installing one of our certificates on an Amazon EC2 Ubuntu server.
![]()
For those wanting to check their version of Ubuntu you can run: lsb_release -a
This is what ours returned:
Distributor ID: Ubuntu
Description: Ubuntu 14.04 LTS
Release: 14.04
So let’s dive into what needs to be done to install our Standard SSL Certificate with Amazon.
Open SSL Install
To check if Open SSL is installed, you can type: openssl version -a
This will return a version and date the open ssl software was built on. If it does not return or says openssl is not installed you will need to install it via:
- sudo apt-get install openssl
Apache 2 SSL Module
Next thing to do if you haven’t already is to enable the SSL module for Apache. This is as simple as typing:
- sudo a2enmod ssl
and then restarting apache
- sudo service apache2 restart
Generating Certificate Signing Request (CSR)
You will need to generate a CSR that will be entered in our SSL certificates management console. Here are the steps on an Amazon Ubuntu Server:
SSH into your server using Putty (in Windows) or via Terminal (in Mac or Linux).
We will want to create a couple of directories to store the various files, like so:
- mkdir /etc/apache2/ssl
- mkdir /etc/apache2/ssl/private
- cd /etc/apache2/ssl/
Then you type this command to actually generate the CSR that will be going into the admin panel.
- sudo openssl req -new -newkey rsa:2048 -nodes -keyout website.key -out website.csr
It will begin to generate and ask your for the following info — Country Name, State, Locality Name, Organization Name, Unit, Common Name (domain) and email address. For more information on what to input here visit this help article.
Your csr is now done, and ready to have the information copied. To do this you would type
- sudo nano /etc/apache2/ssl/website.csr
and then copy that into the next section within the Domains at Retail SSL Management panel when required.
SSL Management Screen - Create Certificate
Now to the part where you generate the SSL files through our Admin Panel. Assuming you have already purchased a SSL from our site, you may log in and then go to your Accounts page. From there find the SSL section and click Launch

Upon launching, you will want to set the SSL to use a Third Party, Dedicated Server or Virtual Dedicated Server option. Note, this would also work when setting up ssl for different providers other than Amazon, such as Rack space. We’re just focusing on Amazon for this blog post, due to its popularity.
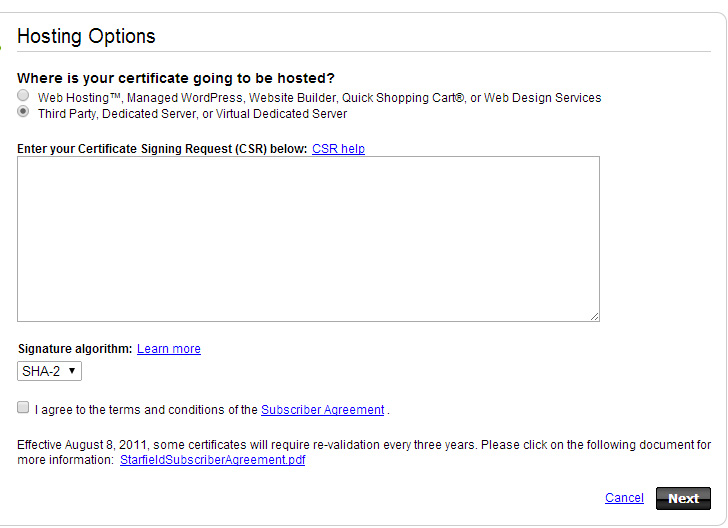
In the “Enter your CSR below” we will want to paste in the contents of the “website.csr” file we created earlier in the process. From there click to agree to the terms and conditions, and click Next.
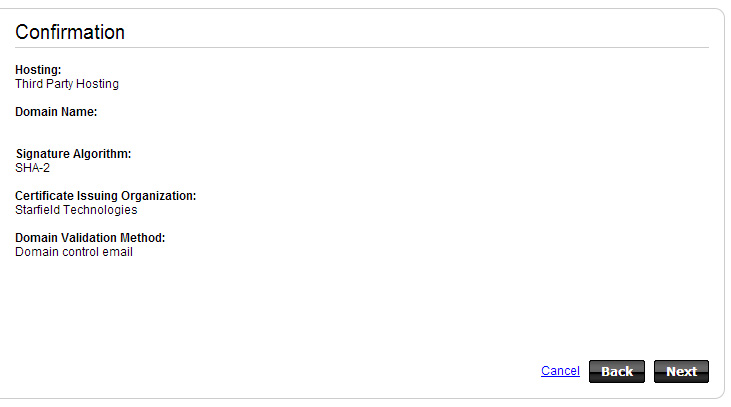
The next step will require a Domain Validation option to be selected (Note: Deluxe and Premium SSL may slightly differ in the process). We selected to do the “Domain Control Email” option, as we find it easier to upload a file to our website to verify than confirm via email. Others may prefer the verify by email selection as highlighted below:

You will then receive confirmation that your SSL is setup.
At this point you will receive a couple emails with next steps on verification — either via email or doing the website domain control option. Here are the steps for doing the domain control option:
Domain Control Email Validation
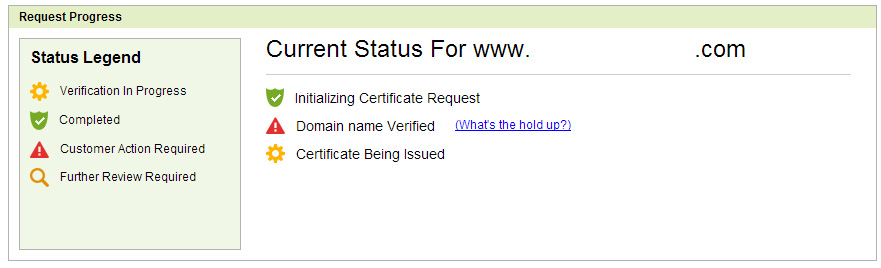
From the My account screen, click the SSL certificates tab and click Launch to get and select the certificate you just setup. You will see the following status:
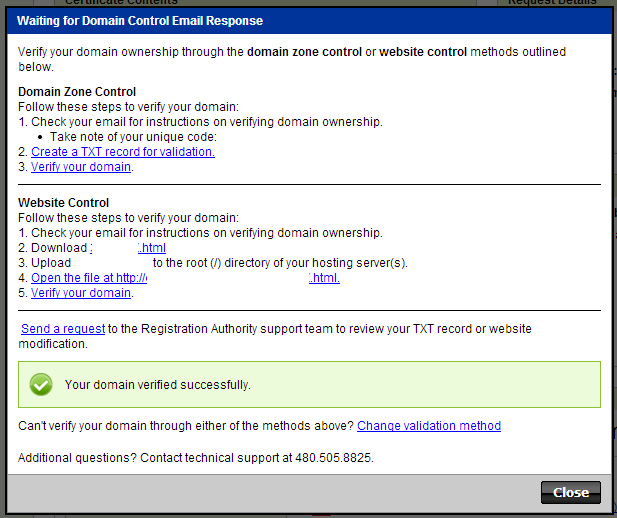
From there click the “Whats the hold up?” and you can start the validation. Here it will give you instructions to download the verification file under “Website Control” and after it has been uploaded to your site, click Verify the domain. You will get a green message indicating it was successful.
Your certificate is now complete and will show in your Secure Certificate Services management area. Here is what to expect to see:
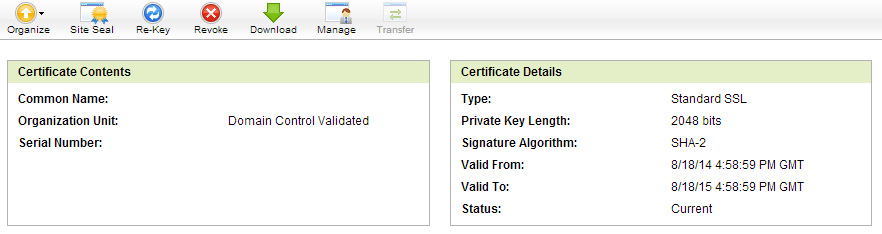
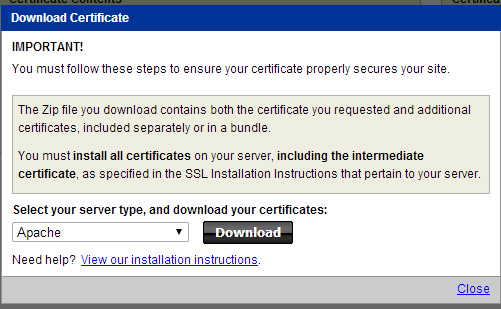
At this point you will need to download the files by clicking the Download arrow, where you will see this screen — since we are doing an Amazon EC2 Ubuntu server, we are running Apache and want to ensure we select that in the dropdown:
Adding SSL Files to Amazon Server
Using a program like WinSCP or program of choice to get files onto your Amazon Server, upload the files you just downloaded. In our case there were two files in the zip — both “.crt” files — our main one “file1.crt” and a sf_bundle-g2-g1.crt file. They should be uploaded to the /etc/apache2/ssl/ folder as created in our earlier steps.
Adding SSL VirtualHost Entries
At this point, all we need to do is enable the VHOST for our site to render the SSL pages. You will either need to create a new VHOST entry if its a new site, or add this to an existing entry for your site.
<VirtualHost *:443>
ServerName website.com
ServerAlias www.website.com
DocumentRoot /documentroot/
SSLEngine on
SSLCertificateFile /etc/apache2/ssl/file1.crt
SSLCertificateKeyFile /etc/apache2/ssl/private/website.key
SSLCertificateChainFile /etc/apache2/ssl/sf_bundle-g2-g1.crt
</VirtualHost>
Website.key is the one we created in the beginning steps. File1.crt will be named something like 12aaaa12.crt when downloaded. Name this to whatever you have received. The SSL Chain File is required to work as well, which is the second file included in the download.
Ensure to restart apache: sudo service apache2 restart
Enable SSL Traffic on Amazon EC2
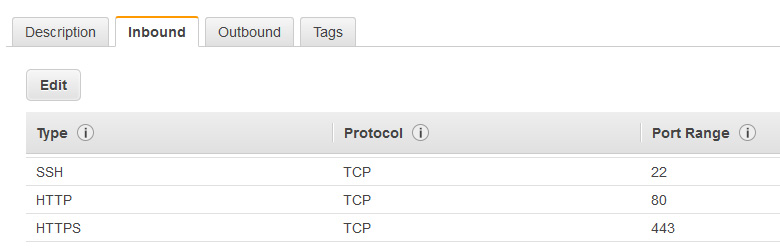
One last step is to ensure SSL traffic is enabled or your security group in Amazon. By default, Amazon does not enable this as not all sites will need it. Log in to your Amazon account, go to EC2 and your server instance. From their click on the Security Group assigned to your site, and enable HTTPs traffic for Inbound.
Load your site and you should now be able to run https! Just make sure to redirect any http url’s to https, so your not serving the same content up twice by mistake, as this would be bad for SEO and hurt your Google rankings. One main reason to add SSL is for Google rankings — we don’t want to gain a little, and lose our seo by serving duplicate content.
Any questions? Problems getting it setup? Send us a tweet @domainsatretail!